티스토리 뷰
안녕하세요 Gons 입니다.
오늘은 안드로이드에는 기본적으로 있지만
iOS에는 없는 RadioButton 을 만들어보겠습니다.
물론 Segmented Control 이란게 있긴 있습니다.
하지만

이렇게 생겼습니다.
안예쁘고 세로로 만들 수도 없습니다.
그래서 라이브러리를 이용해 라디오버튼을 자유자재로 사용해보겠습니다.
Go Go ~~
오늘은 제가 Github 에서 검색하고 Swift 필터를 하지 않았습니다.
왜냐면 Objective-C 카테고리로 들어가있는데 Swift 도 지원해서 그렇습니다.
앞으로는 Objective-C 로도 검색을 해봐야겠어요 그래야 선택의 폭이 넓어지겠죠?
오늘 우리가 사용할 라이브러리입니다.
https://github.com/DavydLiu/DLRadioButton
↑↑ 여기입니다.
먼저 podfile 에 아래 코드를 넣고 pod install 을 설치해줍니다.
pod 'DLRadioButton', '~> 1.4'※ 설치방법을 모르시면 이전 포스팅 코코아팟 설치 방법을 보고 와주세요.
사용할 ViewController 에 사용할 라이브러리를 import 해주시고요
import DLRadioButton※ 여기서 import 에 안뜨시는분은 커맨드⌘ + B 를 눌러서 한번 빌드하신 후에 진행해주세요.
버튼을 만들어 줍시다.
StoryBoard 에서 만들 때는 이렇게 해주세요.
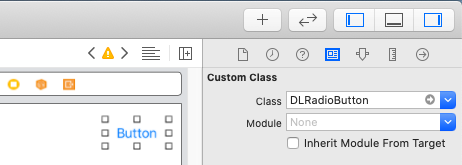
버튼을 넣은 후 Identity inspector 탭에 Custom Class 란에 DLRadioButton 을 넣어주세요.
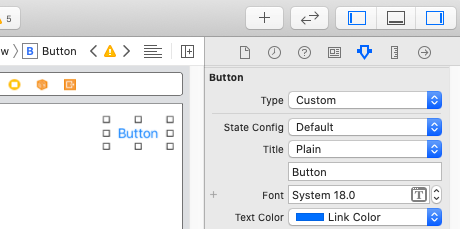
Attributes inspector 탭에 Button Type 을 Custom 으로 만들어주세요.
그러면 텍스트 컬러가 흰색으로 바뀌던데 잘 보일 수 있도록 파란색으로 해주겠습니다.
일단 바로 한번 실행해보죠.

아주 잘 나오네요.
보통 라디오 버튼을 여러가지 선택지 중에 하나를 고를 때 사용하죠?
그래서 그룹을 한번 만들어보겠습니다.
연습으로 버튼 3개 정도 만들어주시고요
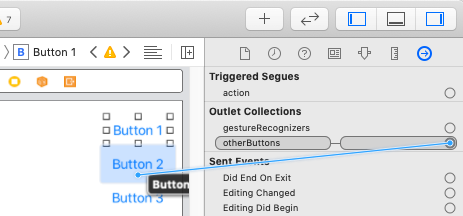
버튼 1번이 선택된 상태에서 Connections inspector 탭에
Outlet Collections 에 otherButtons 우측 + 버튼을
드래그 앤 드랍으로 버튼 2번에 놓습니다.
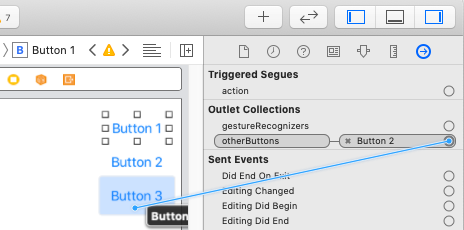
마찬가지로 3번 버튼도 같은 방법으로 지정해줍니다.
바로 또 한번 보겠습니다.
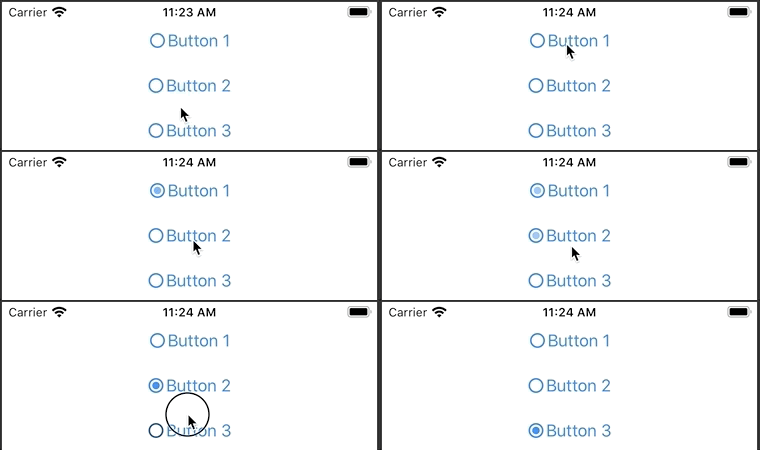
그룹 지정이 잘 됐네요.
자 이제 그러면 코드로 한번 넘어가보겠습니다.
코드로 버튼을 만들 때는 이렇게 해주세요.
var radioButton1 = DLRadioButton()
var radioButton2 = DLRadioButton()
var radioButton3 = DLRadioButton()
타이틀은 이런식으로 작성하면 되고요.
radioButton1.setTitle("선택1", for: .normal)
radioButton2.setTitle("선택2", for: .normal)
radioButton3.setTitle("선택3", for: .normal)
위치, 크기는 이렇게 지정해주세요.
radioButton1.frame = CGRect(x: 100, y: 50, width: 100, height: 50)
radioButton2.frame = CGRect(x: 100, y: 100, width: 100, height: 50)
radioButton3.frame = CGRect(x: 100, y: 150, width: 100, height: 50)
컬러는 이렇게 지정합니다.
radioButton1.setTitleColor( .red , for: .normal)
radioButton2.setTitleColor( .red , for: .normal)
radioButton3.setTitleColor( .red , for: .normal)
그룹은 이렇게
radioButton1.otherButtons.append(radioButton2)
radioButton1.otherButtons.append(radioButton3)
만약 처음 실행했을 때 1번 버튼이 선택된 상태로 켜고 싶다면 viewDidLoad 나 아니면 버튼을 넣는 부분에
radioButton1.isSelected = true이렇게 해놓고 시작하면 선택된 상태로 켜집니다.
터치 이벤트도 넣어보겠습니다.
@objc func btnTouch(_ sender:DLRadioButton) {
	print(sender.currentTitle!)
}
이런식으로 메서드를 하나 만들어주고,
타겟을 추가해줍니다.
radioButton1.addTarget(self, action: #selector(btnTouch(_:)), for: .touchUpInside)
radioButton2.addTarget(self, action: #selector(btnTouch(_:)), for: .touchUpInside)
radioButton3.addTarget(self, action: #selector(btnTouch(_:)), for: .touchUpInside)
그러면 버튼 눌릴 때마다 currentTitle 을 가지고 어떤 버튼이 눌렸는지 처리하면 됩니다.
아이콘 사이즈는 이런식으로 변경합니다.
radioButton1.iconSize = 30
radioButton2.iconSize = 30
radioButton3.iconSize = 30
사각형으로 하고 싶으면 이렇게 쓰면 됩니다.
radioButton1.isIconSquare = true
radioButton2.isIconSquare = true
radioButton3.isIconSquare = true
아 그리고 만들어놓고 view 에 안넣으면 안되겠죠?
self.view.addSubview(radioButton1)
self.view.addSubview(radioButton2)
self.view.addSubview(radioButton3)
마지막으로 이런식으로 뷰에 넣어줍니다.
여기까지하고 한번 볼까요?
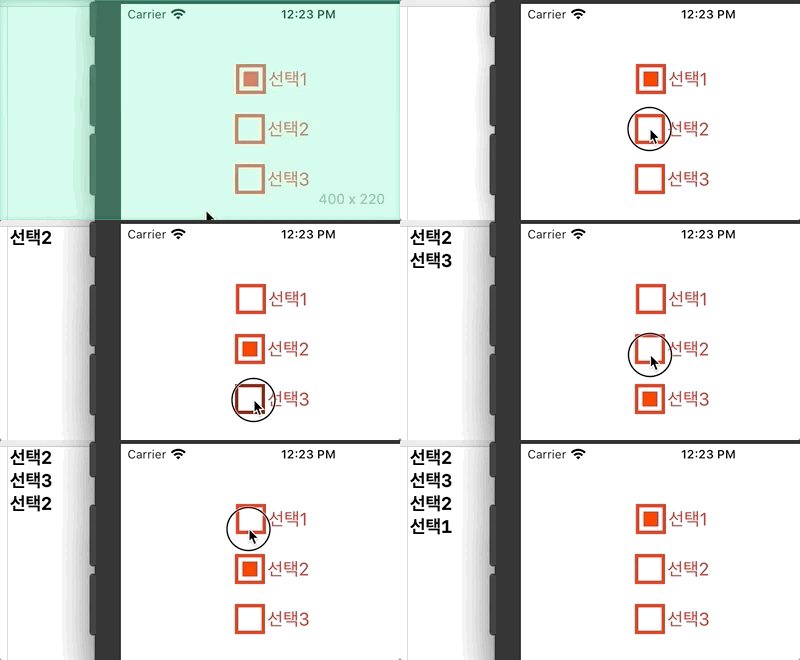
아주 잘 나오네요.
여러개도 선택할 수 있습니다.
radioButton1.isMultipleSelectionEnabled = true
이미지로도 넣을 수 있습니다.
radioButton1.icon = UIImage(systemName: "hand.thumbsdown") ?? radioButton1.icon
radioButton2.icon = UIImage(systemName: "hand.thumbsdown") ?? radioButton2.icon
radioButton3.icon = UIImage(systemName: "hand.thumbsdown") ?? radioButton3.icon
이런식으로 일단 디폴트 이미지를 넣고요
선택됐을 때 이미지도 넣어줍니다.
radioButton1.iconSelected = UIImage(systemName: "hand.thumbsup") ?? radioButton1.iconSelected
radioButton2.iconSelected = UIImage(systemName: "hand.thumbsup") ?? radioButton2.iconSelected
radioButton3.iconSelected = UIImage(systemName: "hand.thumbsup") ?? radioButton3.iconSelected
뒤에 ?? 이거 붙인거는
?? 왼쪽에 이미지가 없을 때
?? 오른쪽에 이미지로 실행시켜라 같은 뜻인데요.
옵셔널입니다.
UIImage systemName 이 iOS 13 부터 있기 때문에
프로젝트 타켓 Deployment 버전이 13 미만이신분들은
UIImage(named: "이미지명") 이런식으로 써주면 됩니다.
이미지 틴트 컬러도 바꿔줍니다.
radioButton1.tintColor = .red
radioButton2.tintColor = .red
radioButton3.tintColor = .red
이렇게요.
글이 길어졌는데 한번 보고 끝내겠습니다.

아주 깔끔하게 나옵니다.
자 이렇게해서 오늘 라디오버튼을 사용해봤는데요
간단하게 만들 수 있죠?
물론 깃허브 페이지에서 사용법을 보고 쓰면 되긴 하는데
저 같은 초보자분들은 좀 어려운게 사실이잖아요.
온통 영어로 써져있기도 하고요...
아무튼 깃허브 페이지에 더 응용해서 사용하는 방법이 나와있습니다.
참고하시면 되겠습니다.
저는 다음에 더 알찬 내용으로 찾아오겠습니다.
긴 글 읽어주셔서 감사합니다.
'iOS Library' 카테고리의 다른 글
| iOS Swift 라이브러리 SideMenu 사용하기 (0) | 2020.06.23 |
|---|---|
| iOS Swift 라이브러리 DropDown 사용하기 (2) | 2020.06.22 |
| iOS Swift 라이브러리 GIF 사용하기 (4) | 2020.06.18 |
| iOS Swift 라이브러리 Activity Indicator 사용하기 (0) | 2020.06.17 |
| iOS Swift 라이브러리 Toast 사용하기 (0) | 2020.06.16 |
- Total
- Today
- Yesterday
- TabBar
- 다국어
- swiftUI
- localizing
- 현지화
- 스위프트
- 심사
- ios
- 테이블뷰
- SWIFT
- 인디케이터
- TabView
- Authorization
- 아이오에스
- 리젝
- connect
- localizable
- macos
- Language
- AppStore
- Xcode
- Reject
- Apple
- 로컬라이징
- picker
- 엑스코드
- custom segment
- indicator
- 프로그레스
- permission
| 일 | 월 | 화 | 수 | 목 | 금 | 토 |
|---|---|---|---|---|---|---|
| 1 | 2 | 3 | ||||
| 4 | 5 | 6 | 7 | 8 | 9 | 10 |
| 11 | 12 | 13 | 14 | 15 | 16 | 17 |
| 18 | 19 | 20 | 21 | 22 | 23 | 24 |
| 25 | 26 | 27 | 28 | 29 | 30 | 31 |
